Integrating with Synology Surveillance Station
Table of Contents
This guide walks you through integrating AITrespasser with your Synology Surveillance Station, enabling you to receive intelligent notifications when your cameras detect motion. Once configured, AITrespasser will analyze detected motion and alert you only about relevant events.
Overview
Before You Begin
We recommend first reading our How AITrespasser Works page to understand the detection capabilities and features before setting up your integration.
This guide walks you through integrating AITrespasser with your Synology Surveillance Station, enabling you to receive intelligent notifications when your cameras detect motion. Once configured, AITrespasser will analyze detected motion and alert you only about relevant events.
Important Requirements
1. Motion Detection: You must enable motion detection in your camera settings or Surveillance Station for AITrespasser to receive and analyze events.
2. Network Accessibility: Your Synology NAS must be accessible from the internet. If your NAS is not internet-accessible, please follow our Guide #2: Local Network Integration.
Prerequisites
Network Requirements
Internet-Accessible NAS
Your Synology NAS needs to be accessible from the internet for optimal functionality, allowing AITrespasser to receive image data directly when motion events are triggered.
Make your NAS internet-accessible using:
- Synology QuickConnect service (recommended)
- Port forwarding with a static IP or dynamic DNS
- Synology DDNS service
Non-Internet-Accessible NAS
If your NAS is not accessible from the internet due to security concerns or network limitations, you'll need to follow our alternative setup method.
Enabling Motion Detection
AITrespasser relies on motion detection events to receive images for analysis. You must enable motion detection using the following method:
In Surveillance Station
- Open Surveillance Station
- Go to "IP Camera"
- Select your camera and click edit
- Navigate to "Event Detection"
- Enable "Motion Detection" and adjust settings
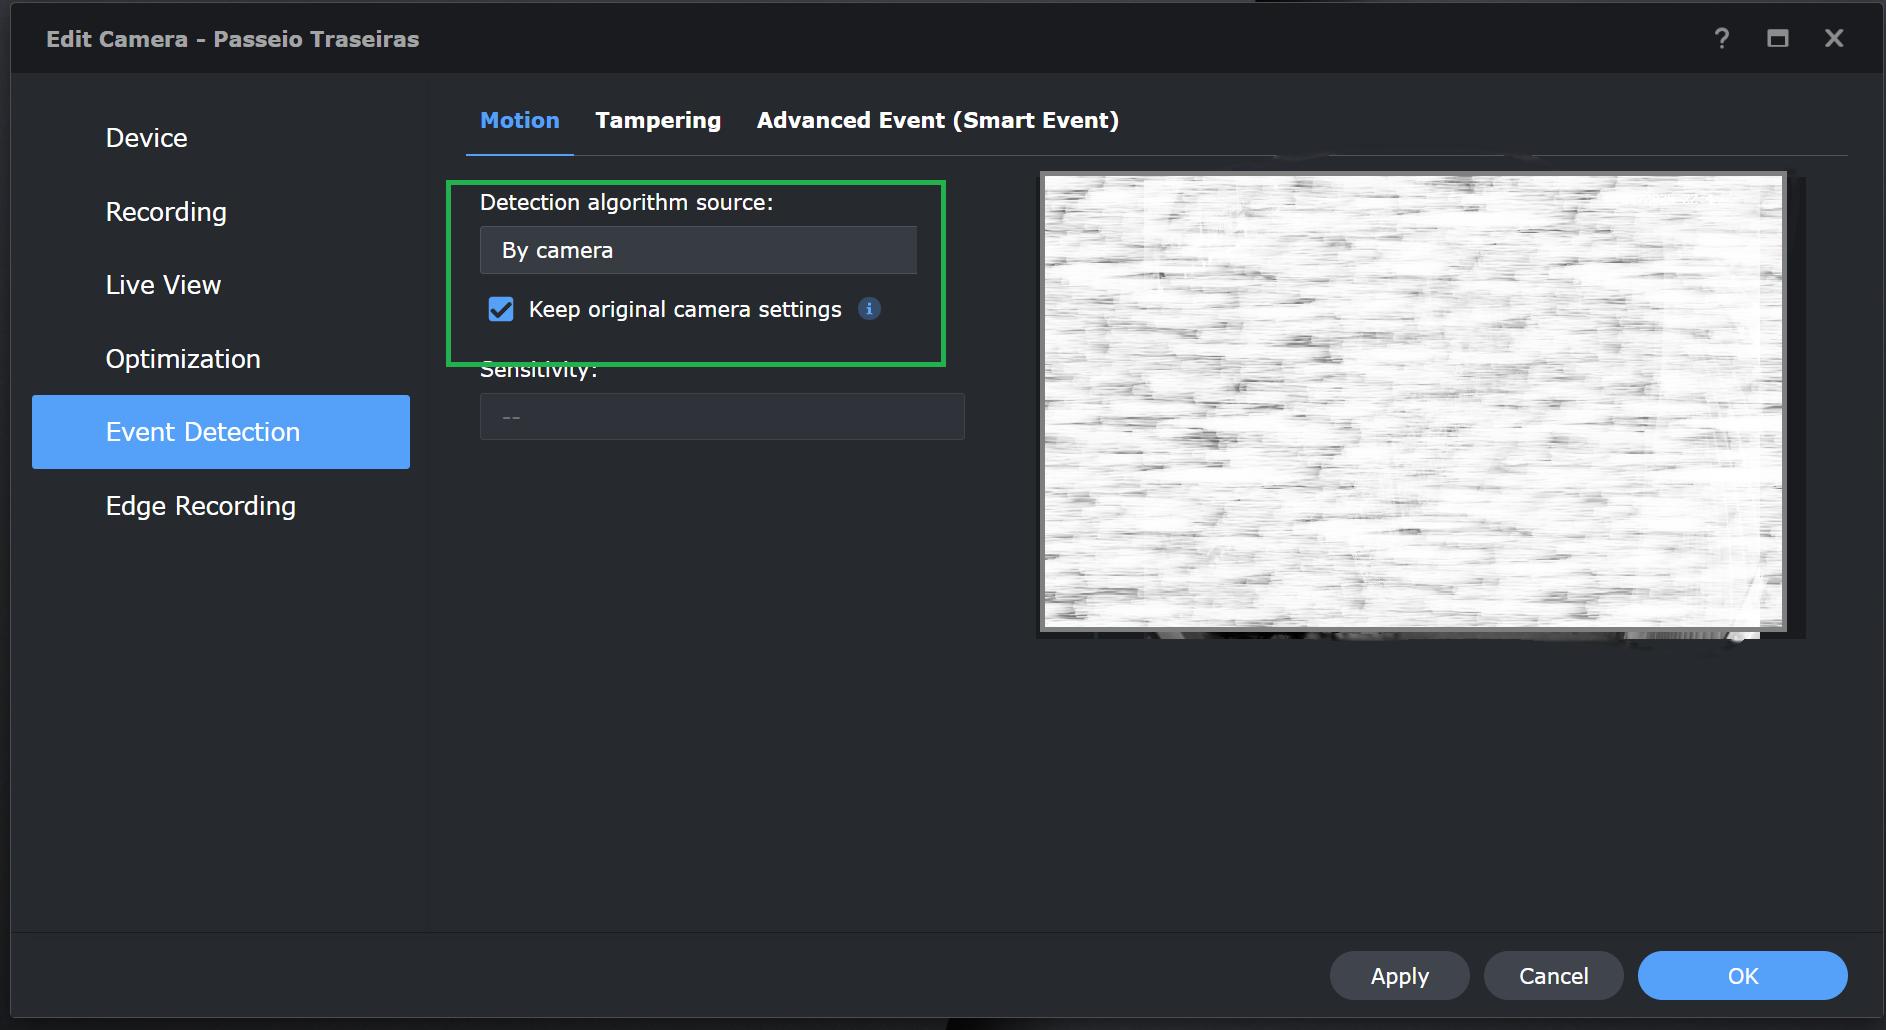
Note: Without motion detection enabled, AITrespasser won't receive any events to analyze.
Setup Notifications
1 Open the Notification Center
Log in to your Synology DSM interface, open Surveillance Station, and navigate to the Notification application.
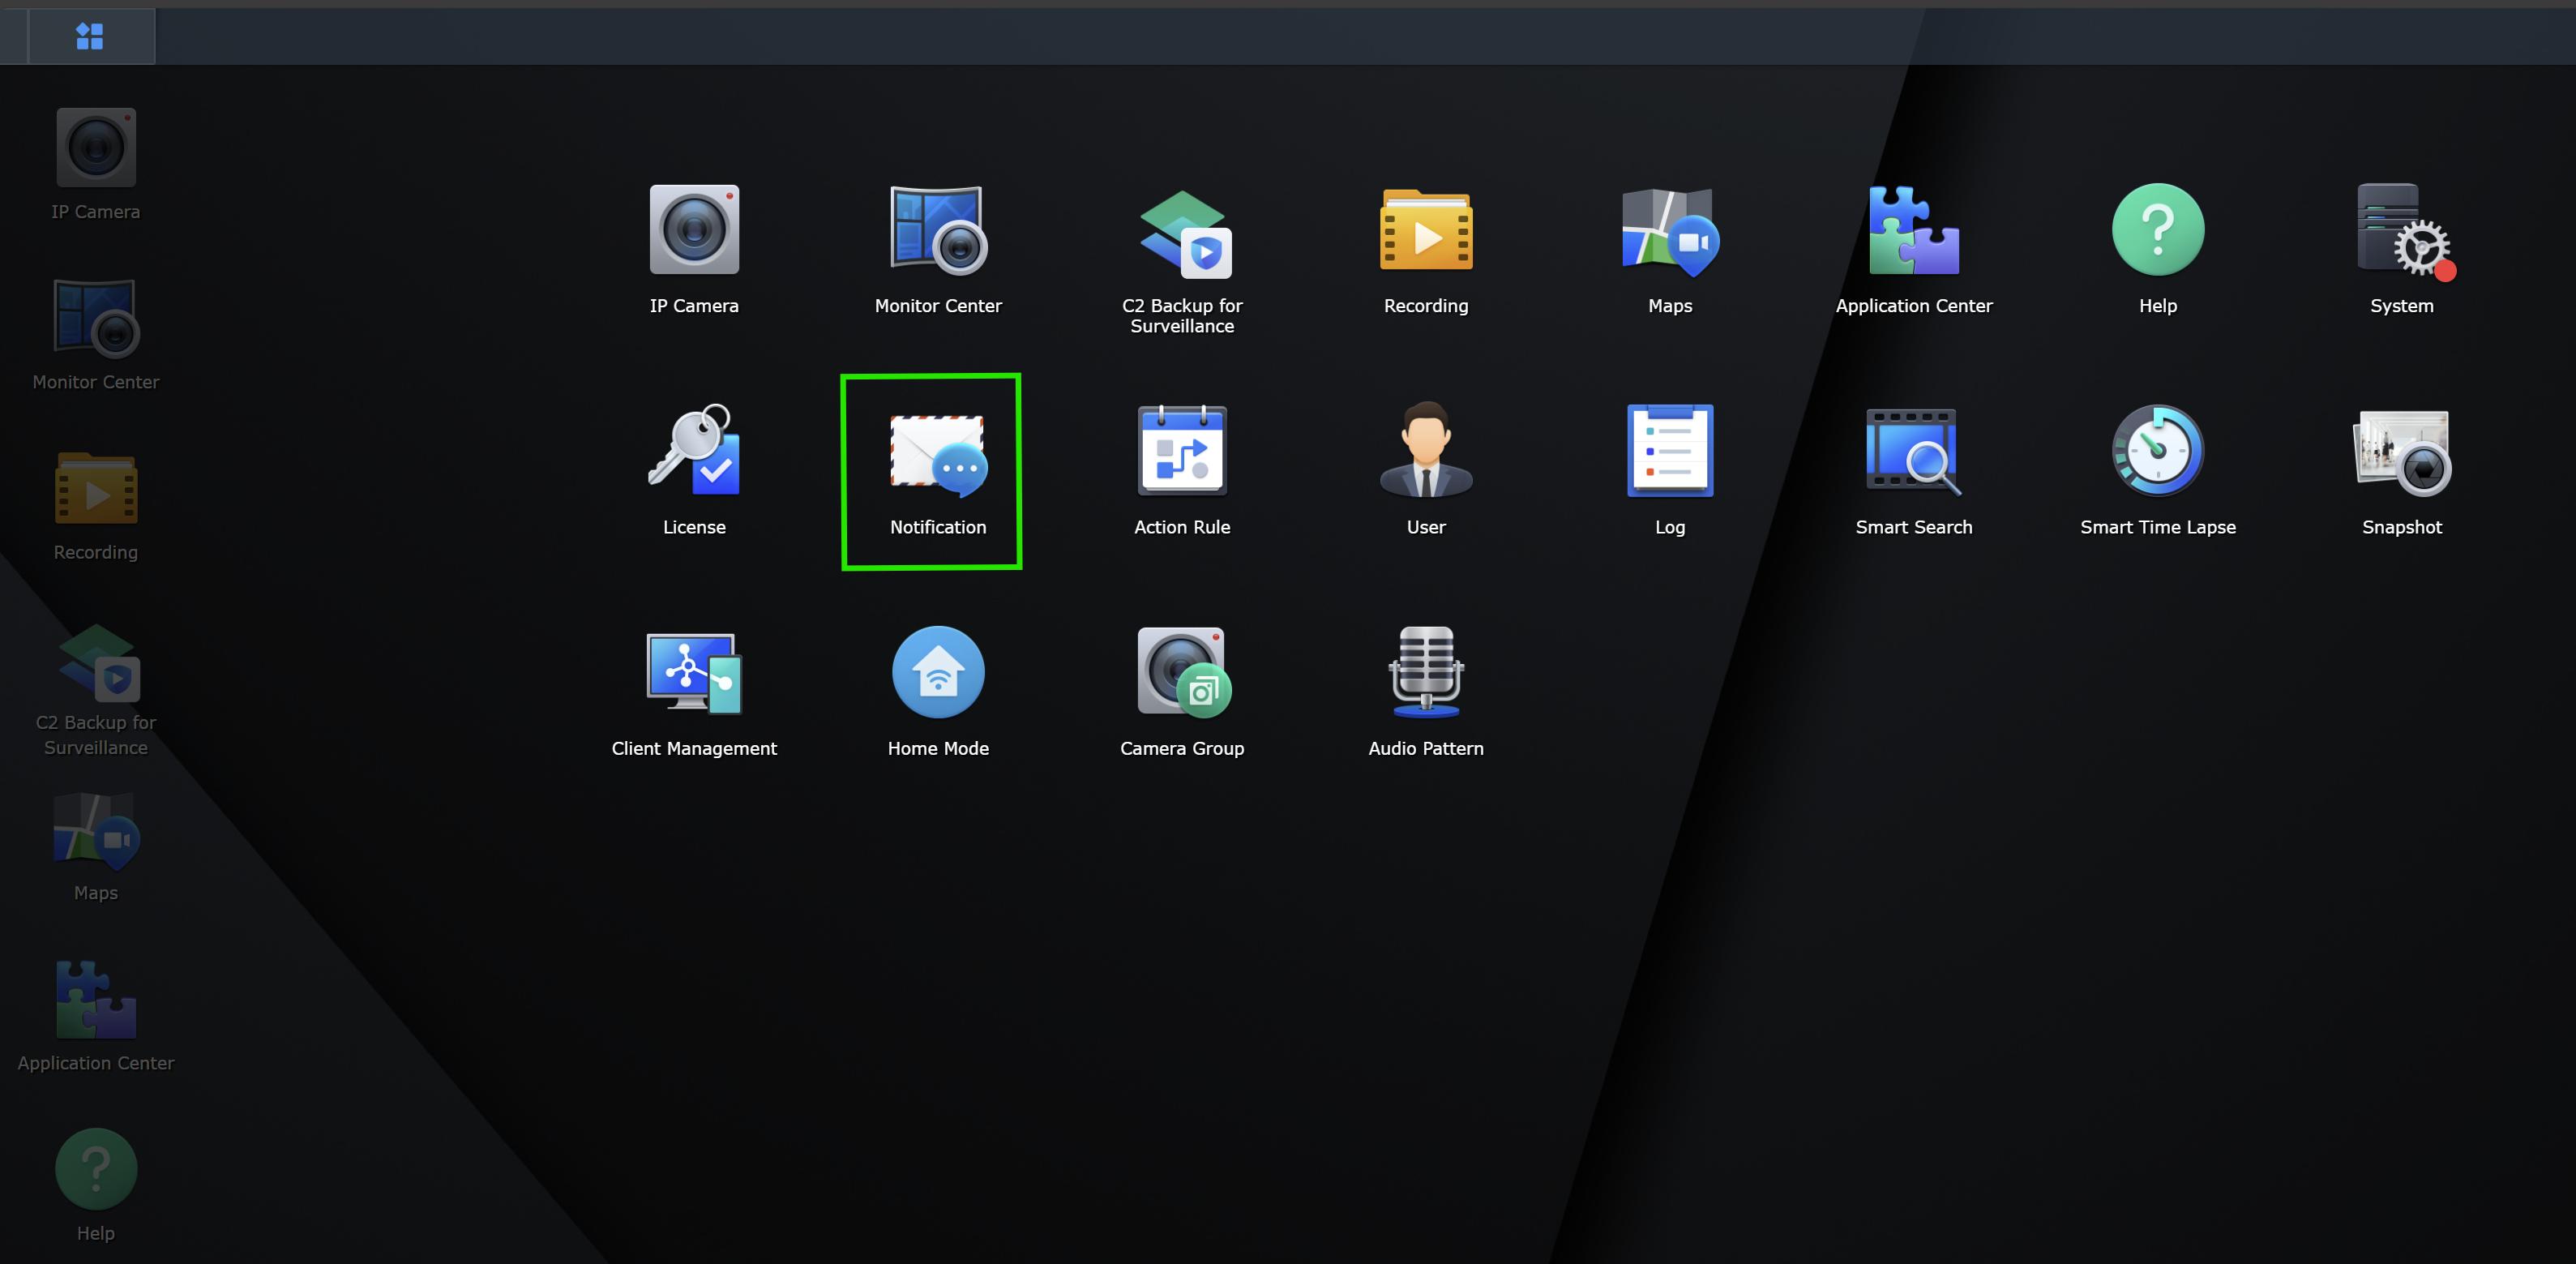
Access the Notification Center from the Surveillance Station menu
2 Access the WebHook Settings
In the Notification Center, locate and click on the WebHook tab to configure a new webhook integration.
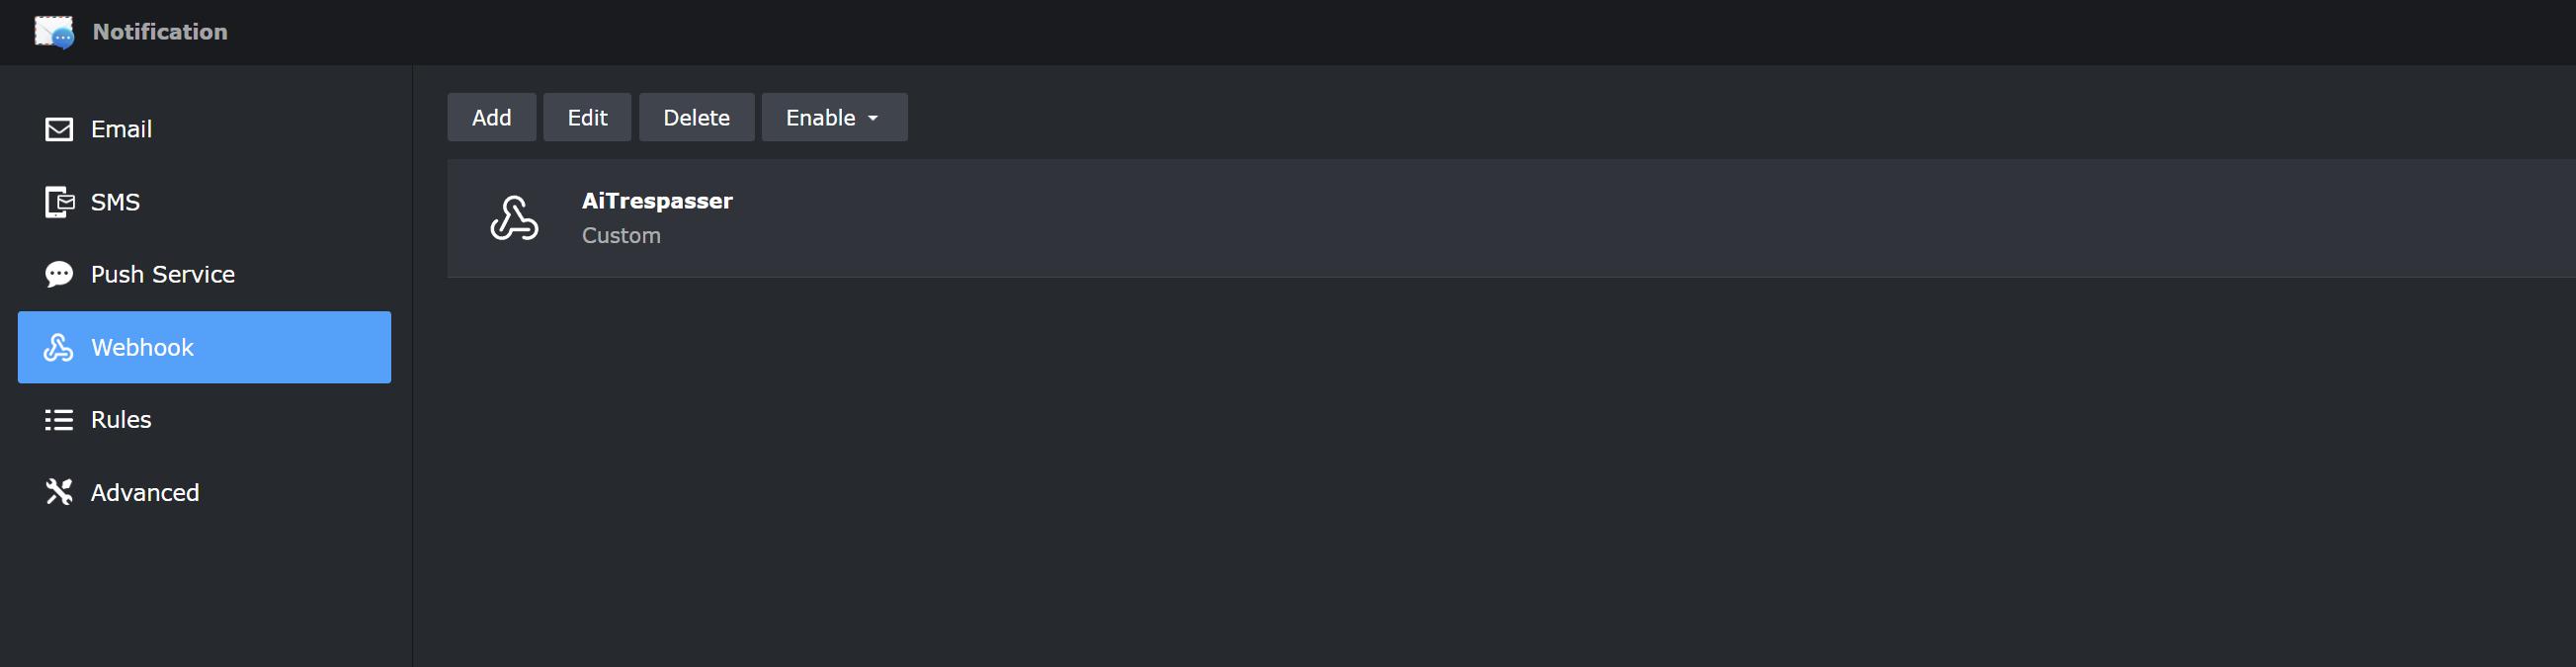
Select the WebHook tab in the Notification Center
3 Create a New WebHook
Click the "Create" button to add a new webhook. Give your webhook a descriptive name like "AITrespasser Integration" and select when you want it to trigger (e.g., on motion detection events).
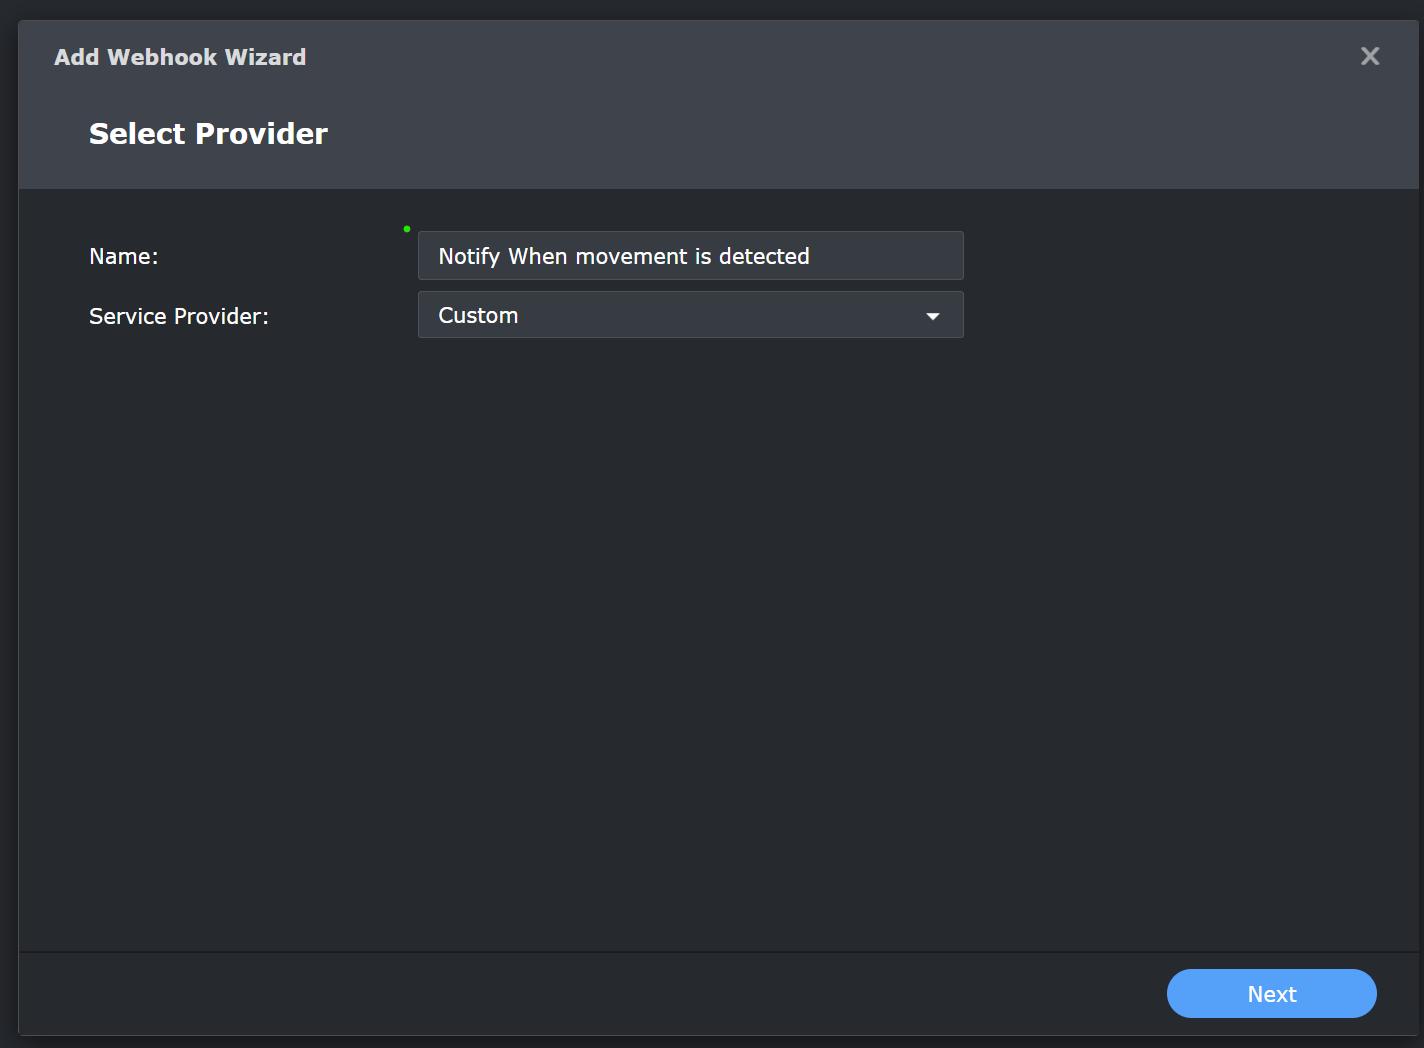
Configure the basic settings for your new webhook
4 Configure the WebHook Details
Configure the webhook with the following parameters to properly integrate with AITrespasser:
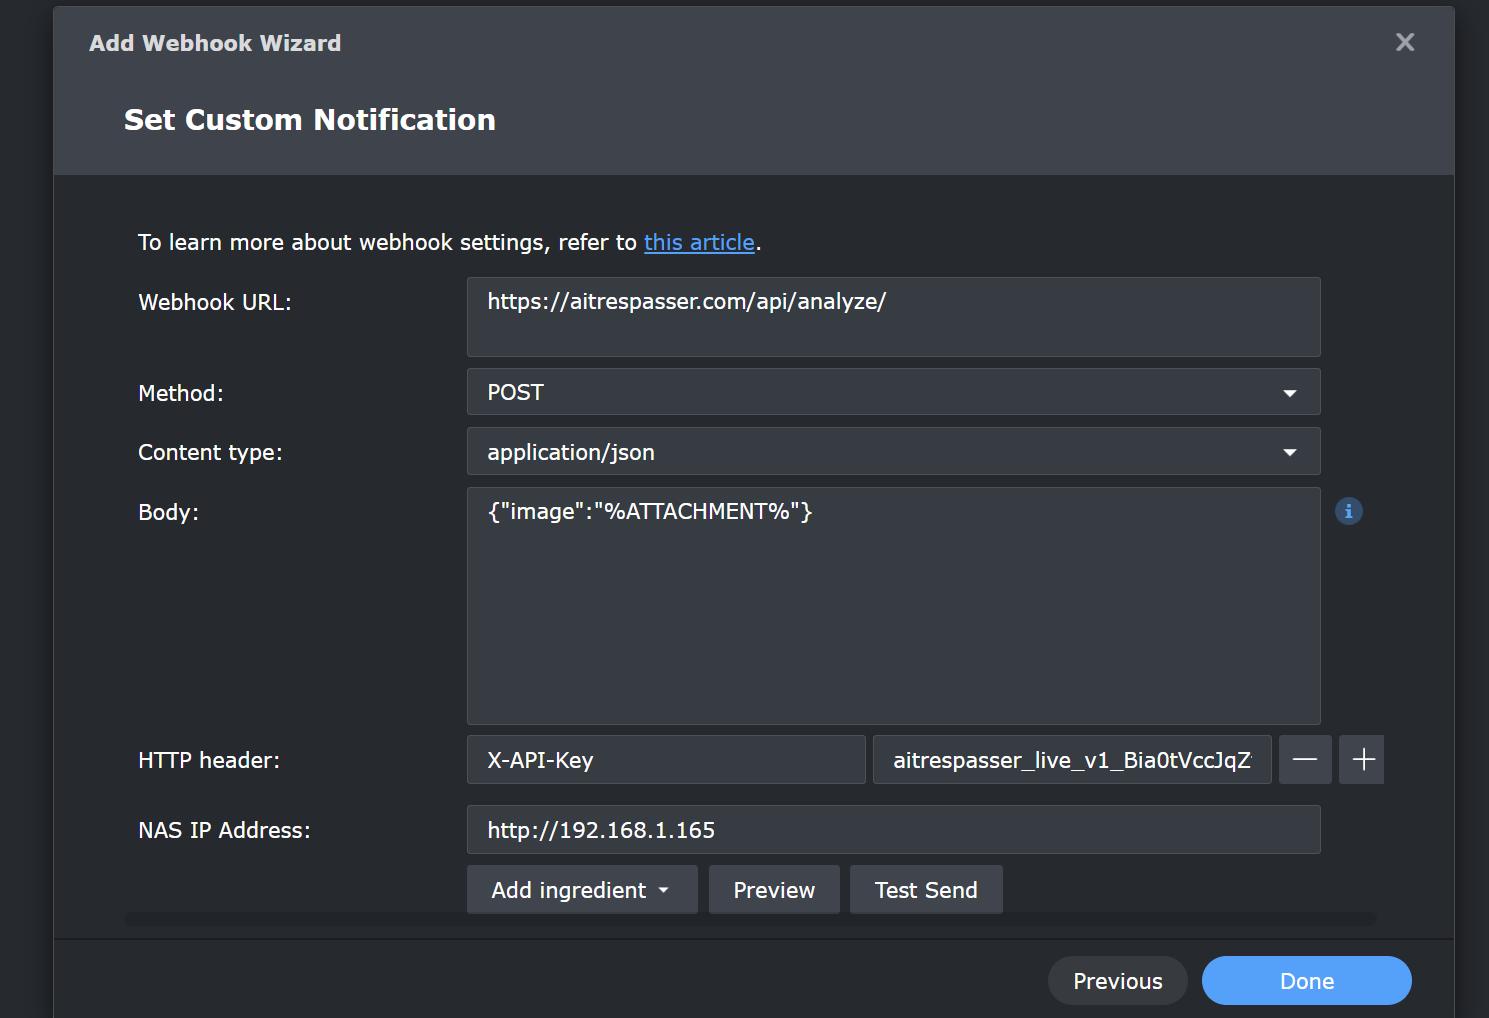
Example of completed webhook configuration
Required Webhook Parameters
| WebHook URL | https://api.aitrespasser.com/api/analyze/
|
|---|---|
| HTTP Method | POST |
| Request Body | {"image":"%ATTACHMENT%"} |
| NAS IP Address | Ip Address or Hostname of your nas. It must be accessible from the internet. If it is not accessible configure the internal middle ware following our guide |
| HTTP Header |
Header Name: X-API-Key
Header Value: |
%ATTACHMENT% placeholder will
be automatically replaced with the camera image when motion is detected.
Configure cameras Monitoring
Monitor All Cameras
Set up a single webhook for all cameras in your system. Simple to configure and maintain.
Select Specific Cameras
Configure individual rules for each camera you want to monitor with AITrespasser.
Option 1: Monitoring All Cameras
This option sets up a global webhook that will send all motion events from all cameras to AITrespasser.
1 Enable Notifications
Make sure that the webhooks option is enabled for "Motion Detected" but not for "Action Rule"
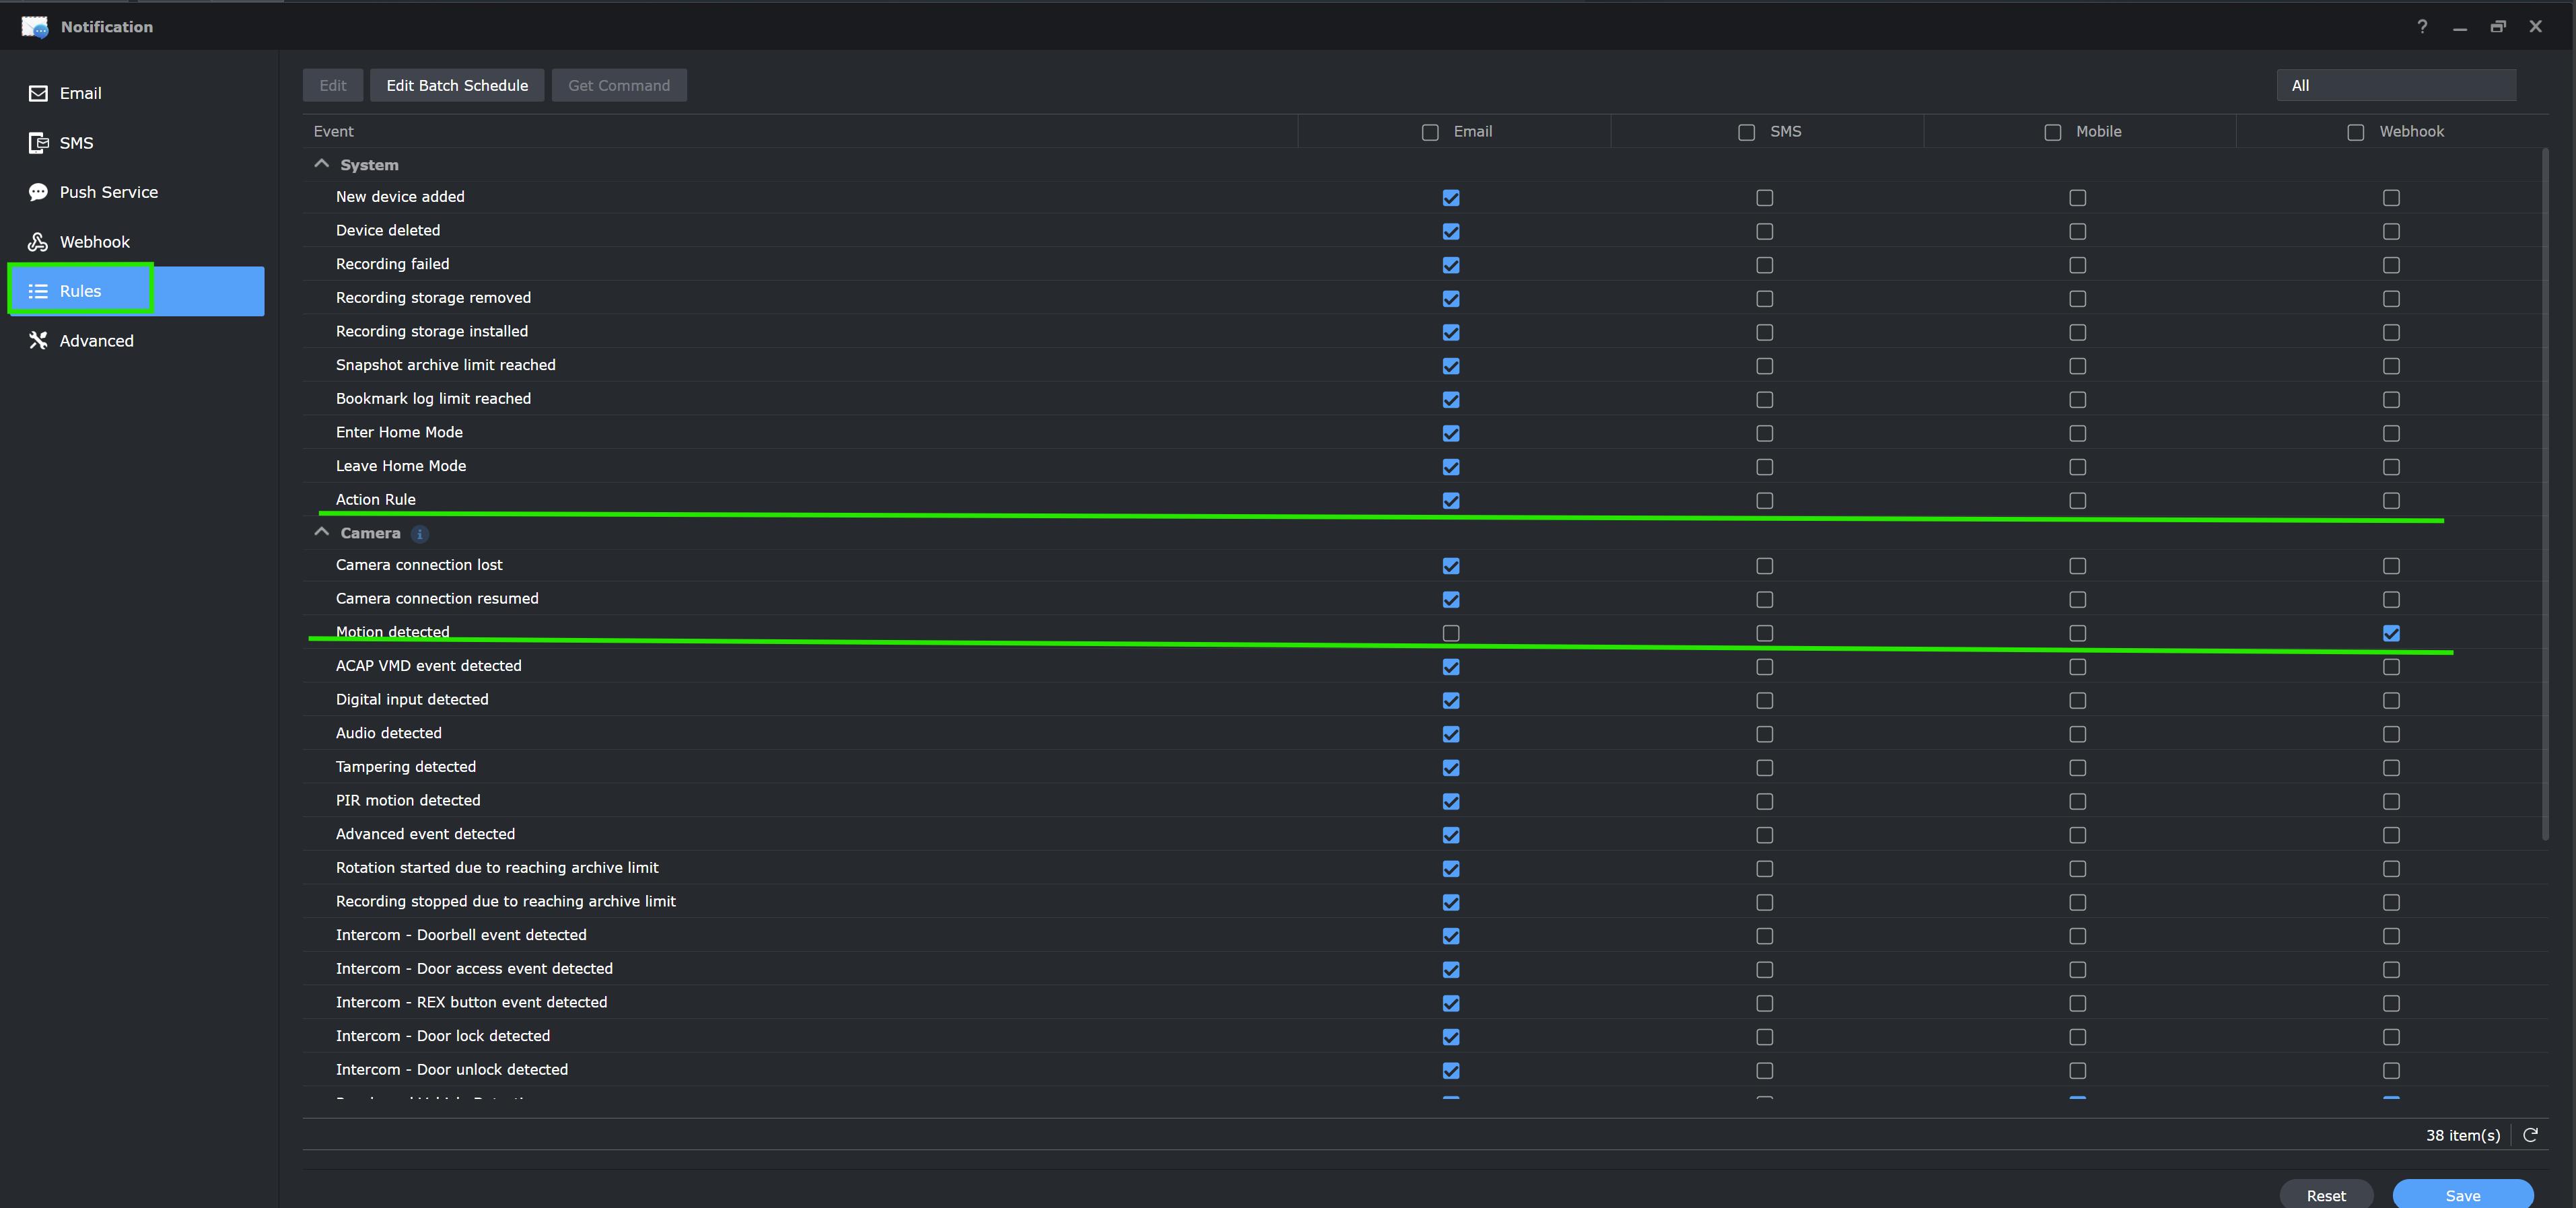
Configure the basic settings for your new webhook
Setup Complete!
Your webhook is now configured to send all motion detection events to AITrespasser. When motion is detected by any camera in your Surveillance Station, the image will be sent to AITrespasser for analysis.
Option 2: Monitoring Specific Cameras
This option lets you create individual rules for each camera you want to monitor with AITrespasser.
1 Open Action Rules Application
Open the Action Rules application to create specific rules for your selected cameras.
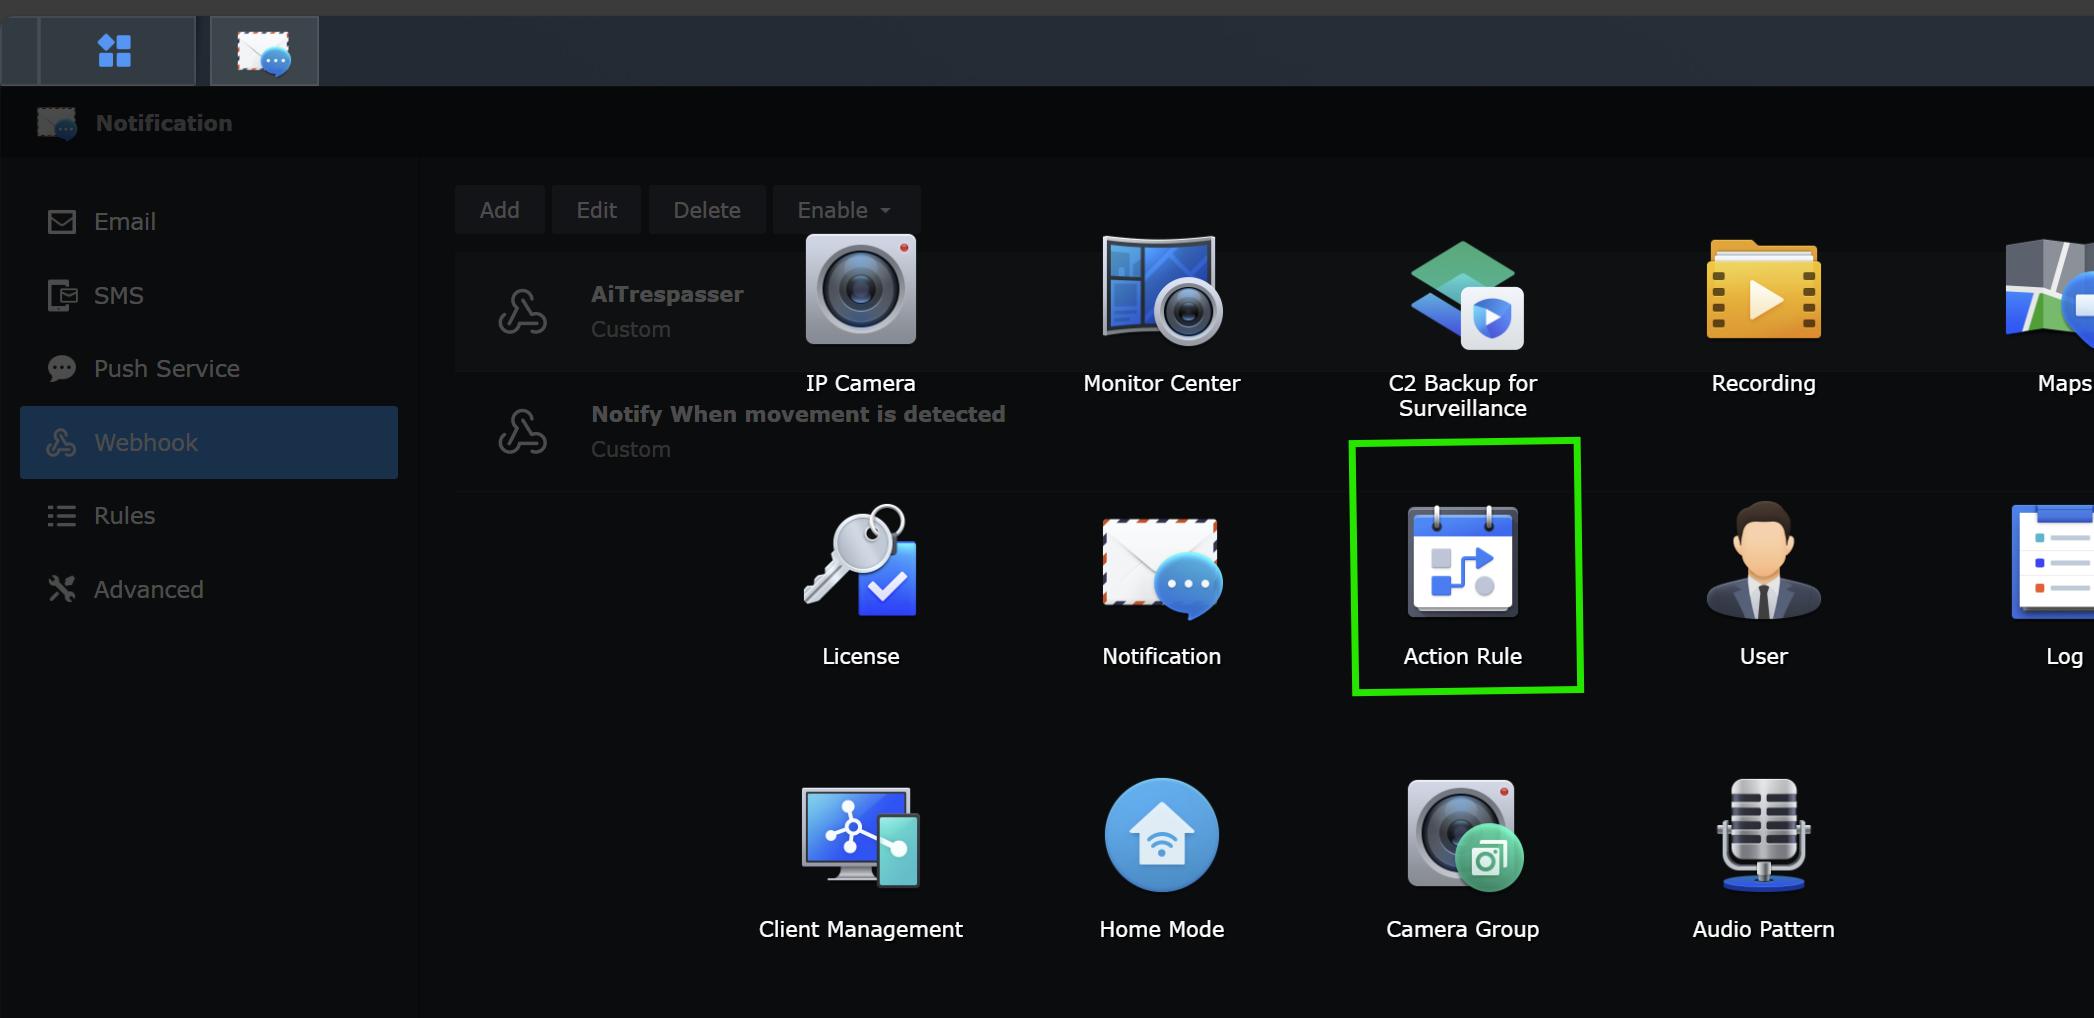
Navigate to the Action Rules application in Surveillance Station
2 Add New Action Rule
Click "Add" to create a new action rule for a specific camera.

Click the "Add" button to create a new action rule
3 Name Your Rule
Give your action rule a descriptive name that includes the camera name, such as "AITrespasser - Front Door Camera".
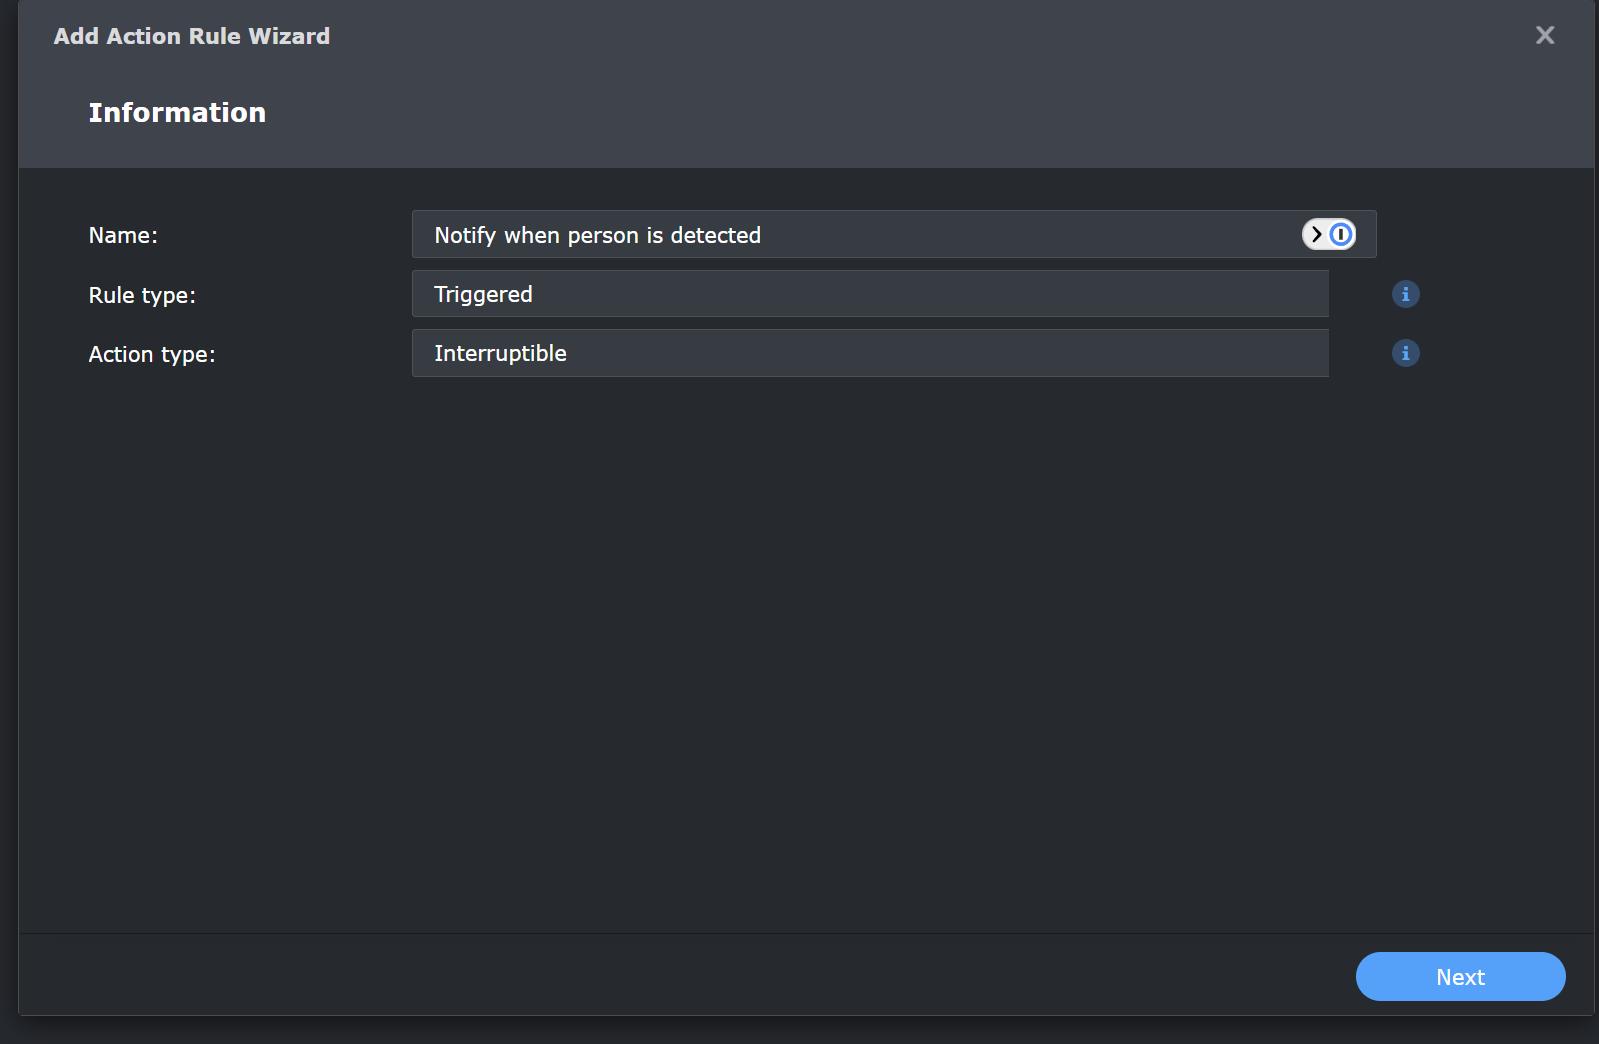
Enter a descriptive name for your action rule
4 Configure Source camera
This is a key step for specific camera monitoring: Select only the individual camera you want to monitor with this rule.
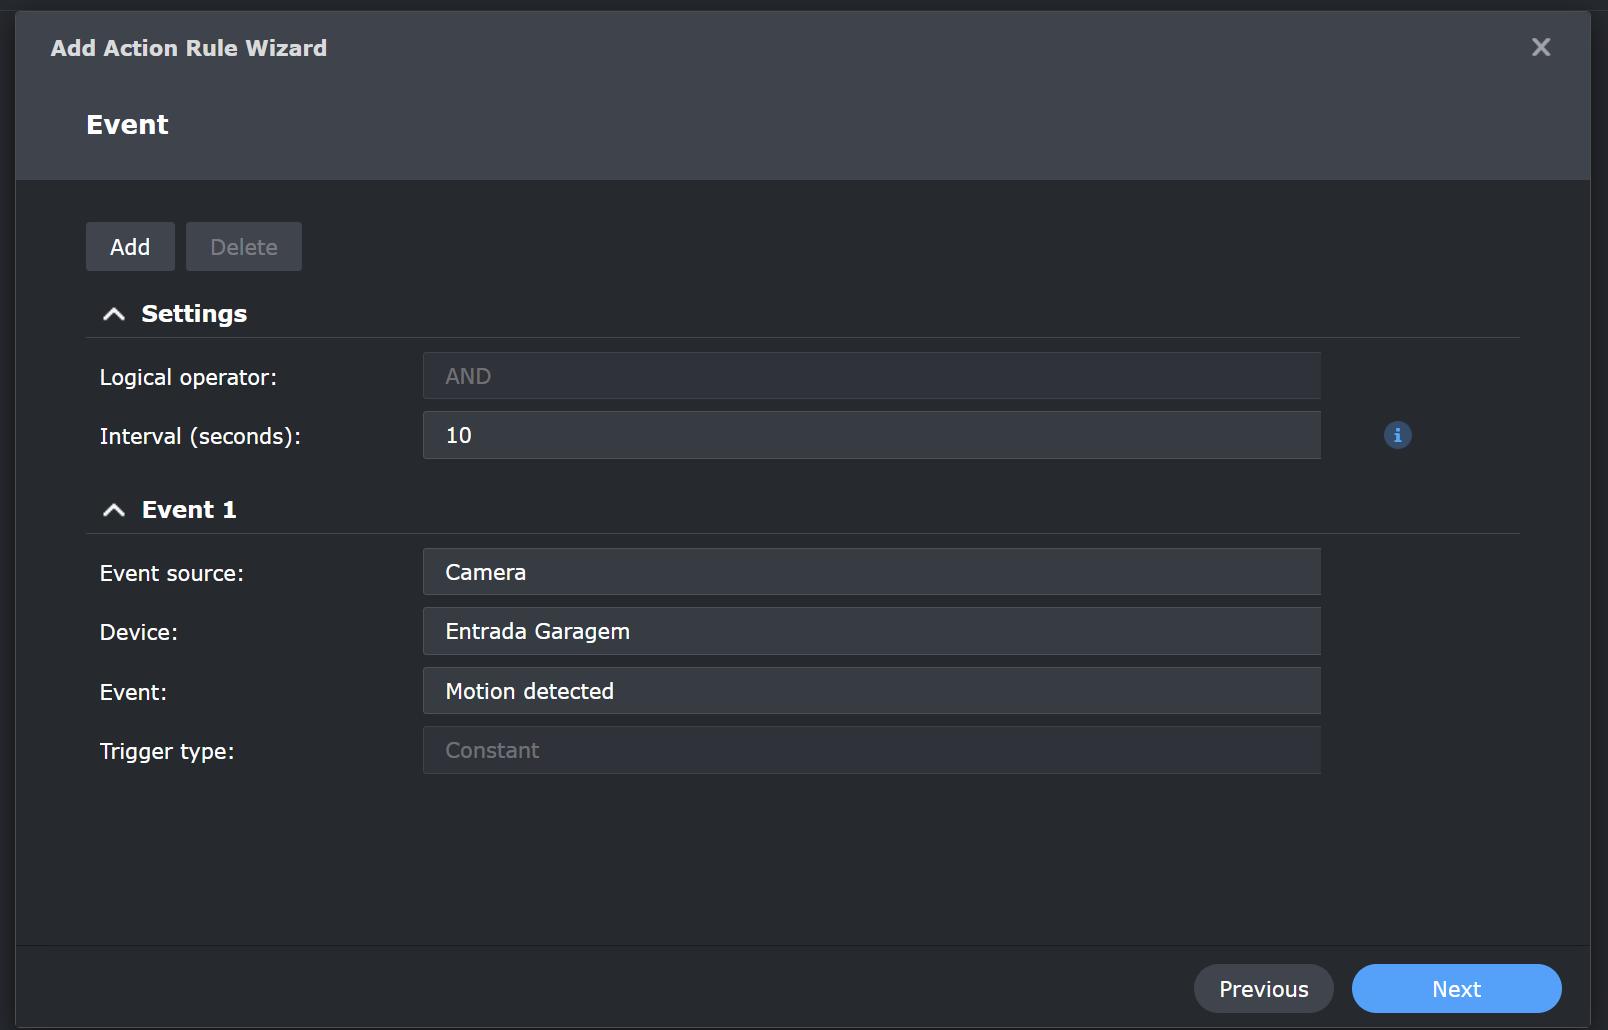
Choose a single camera from the dropdown list
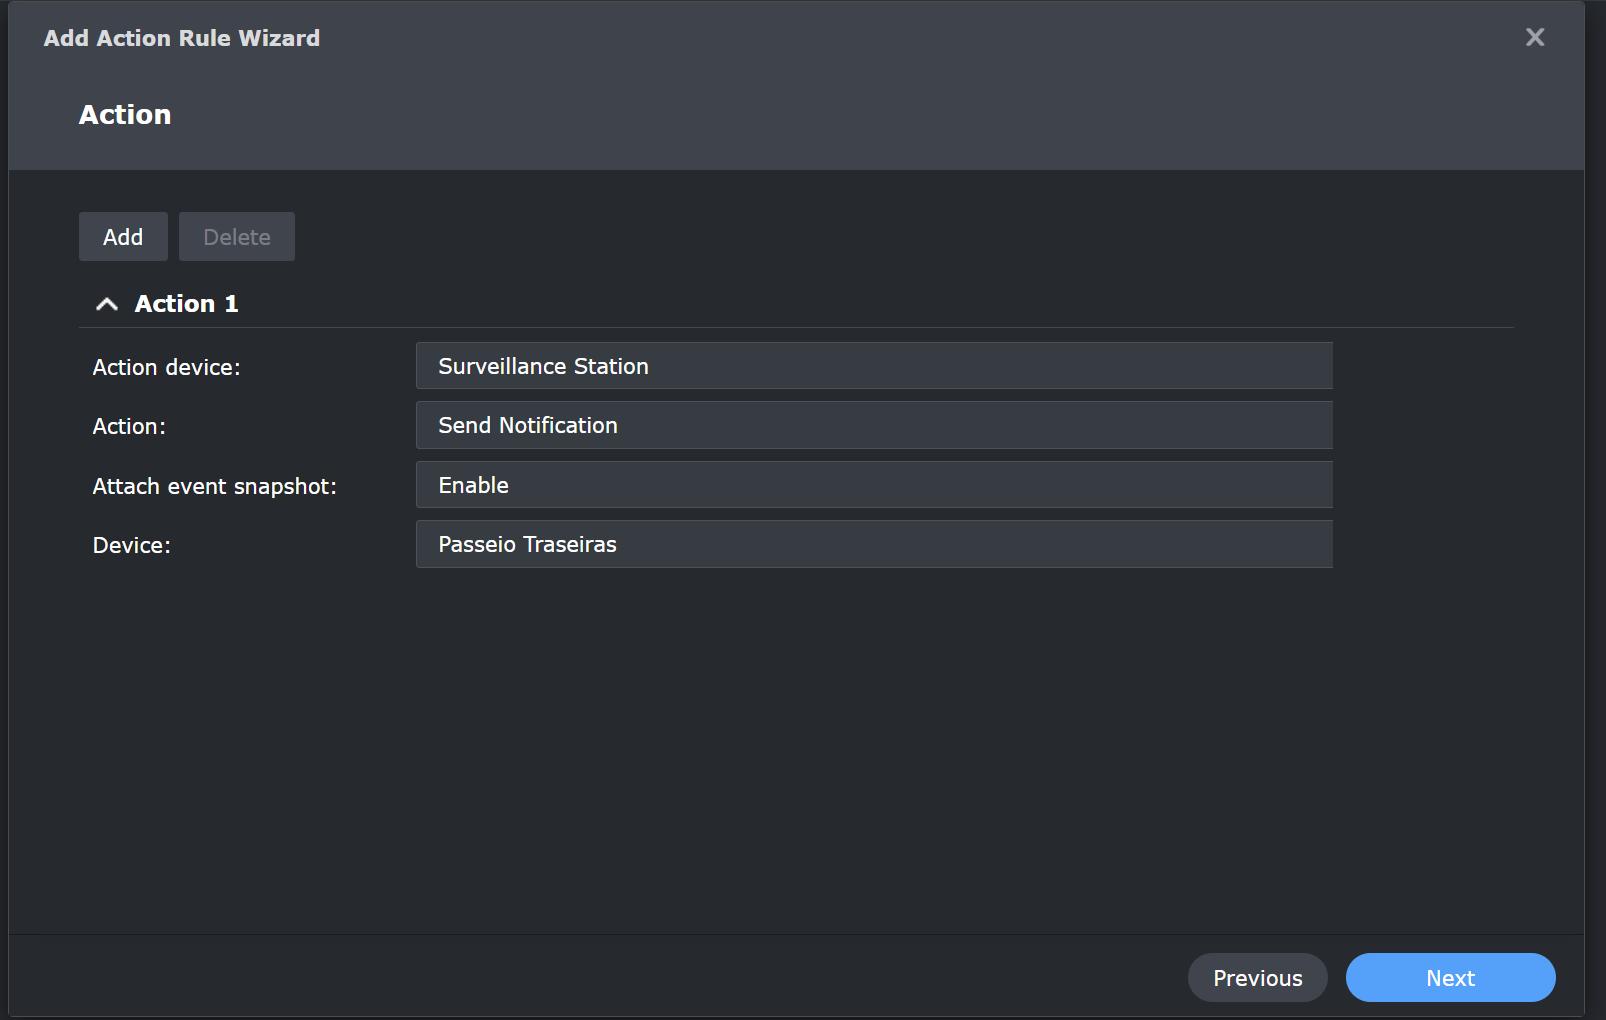
5 Configure Action
Configure what will happen when motion is detected. Here we configure surveillance center to send a notification with the snapshot attached to the notification.
Set the trigger to "Motion Detection"
6 Configure Schedule (Optional)
Optionally, set a schedule if you want the alerts to trigger only during specific hours.
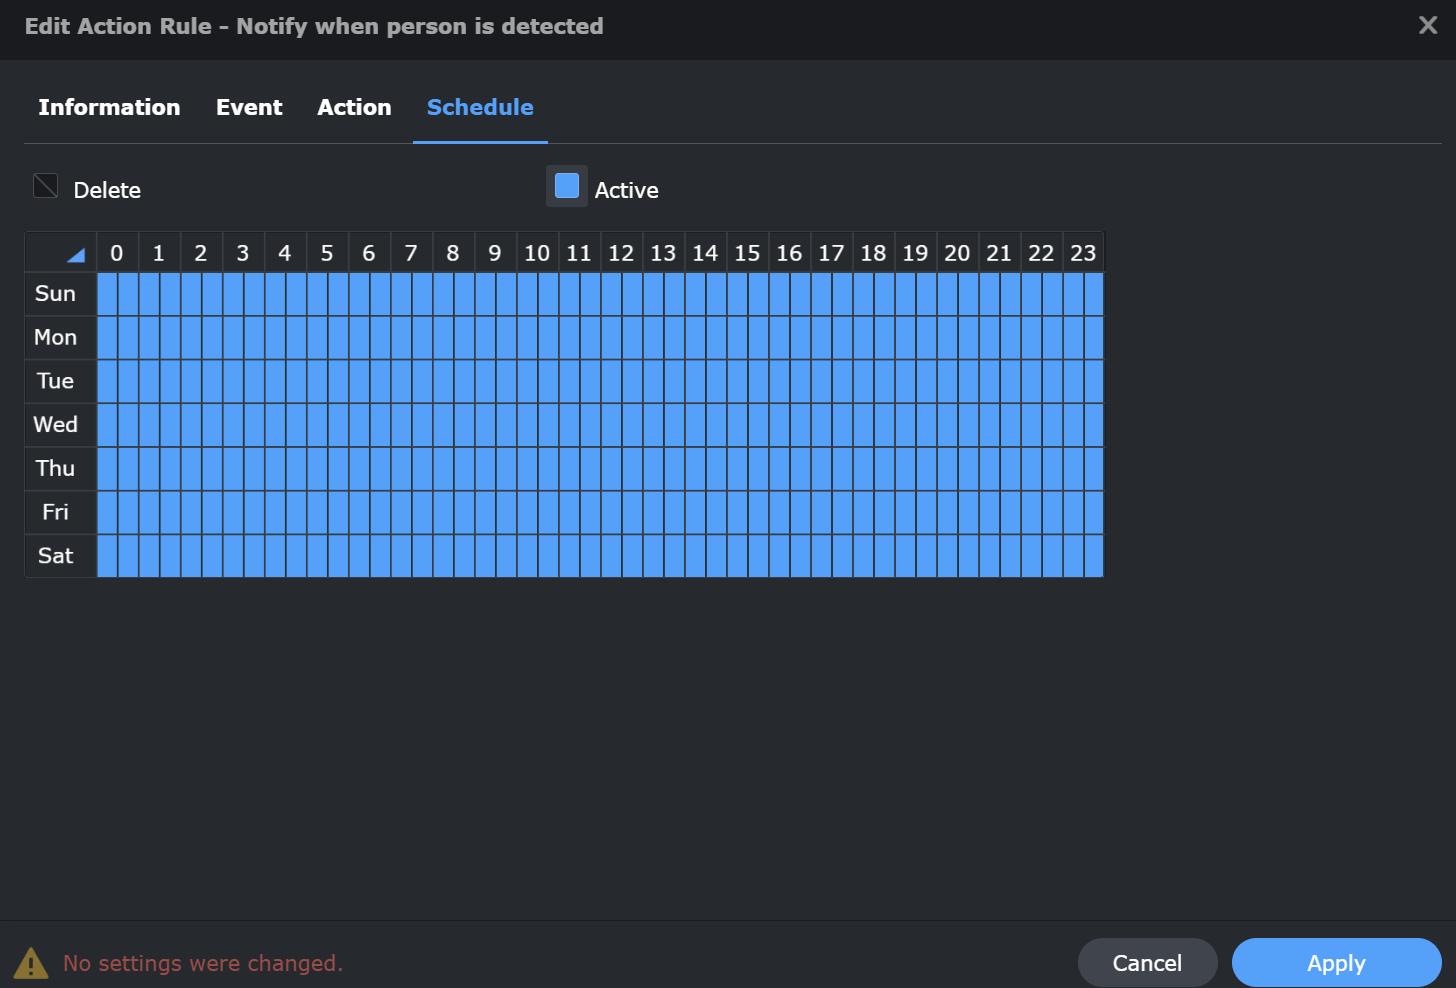
Configure a schedule if needed, or leave as "Always" for 24/7 monitoring
7 Enable Notifications
Make sure that the webhooks option is enabled for "Action Rule" but not for "Motion Detected"
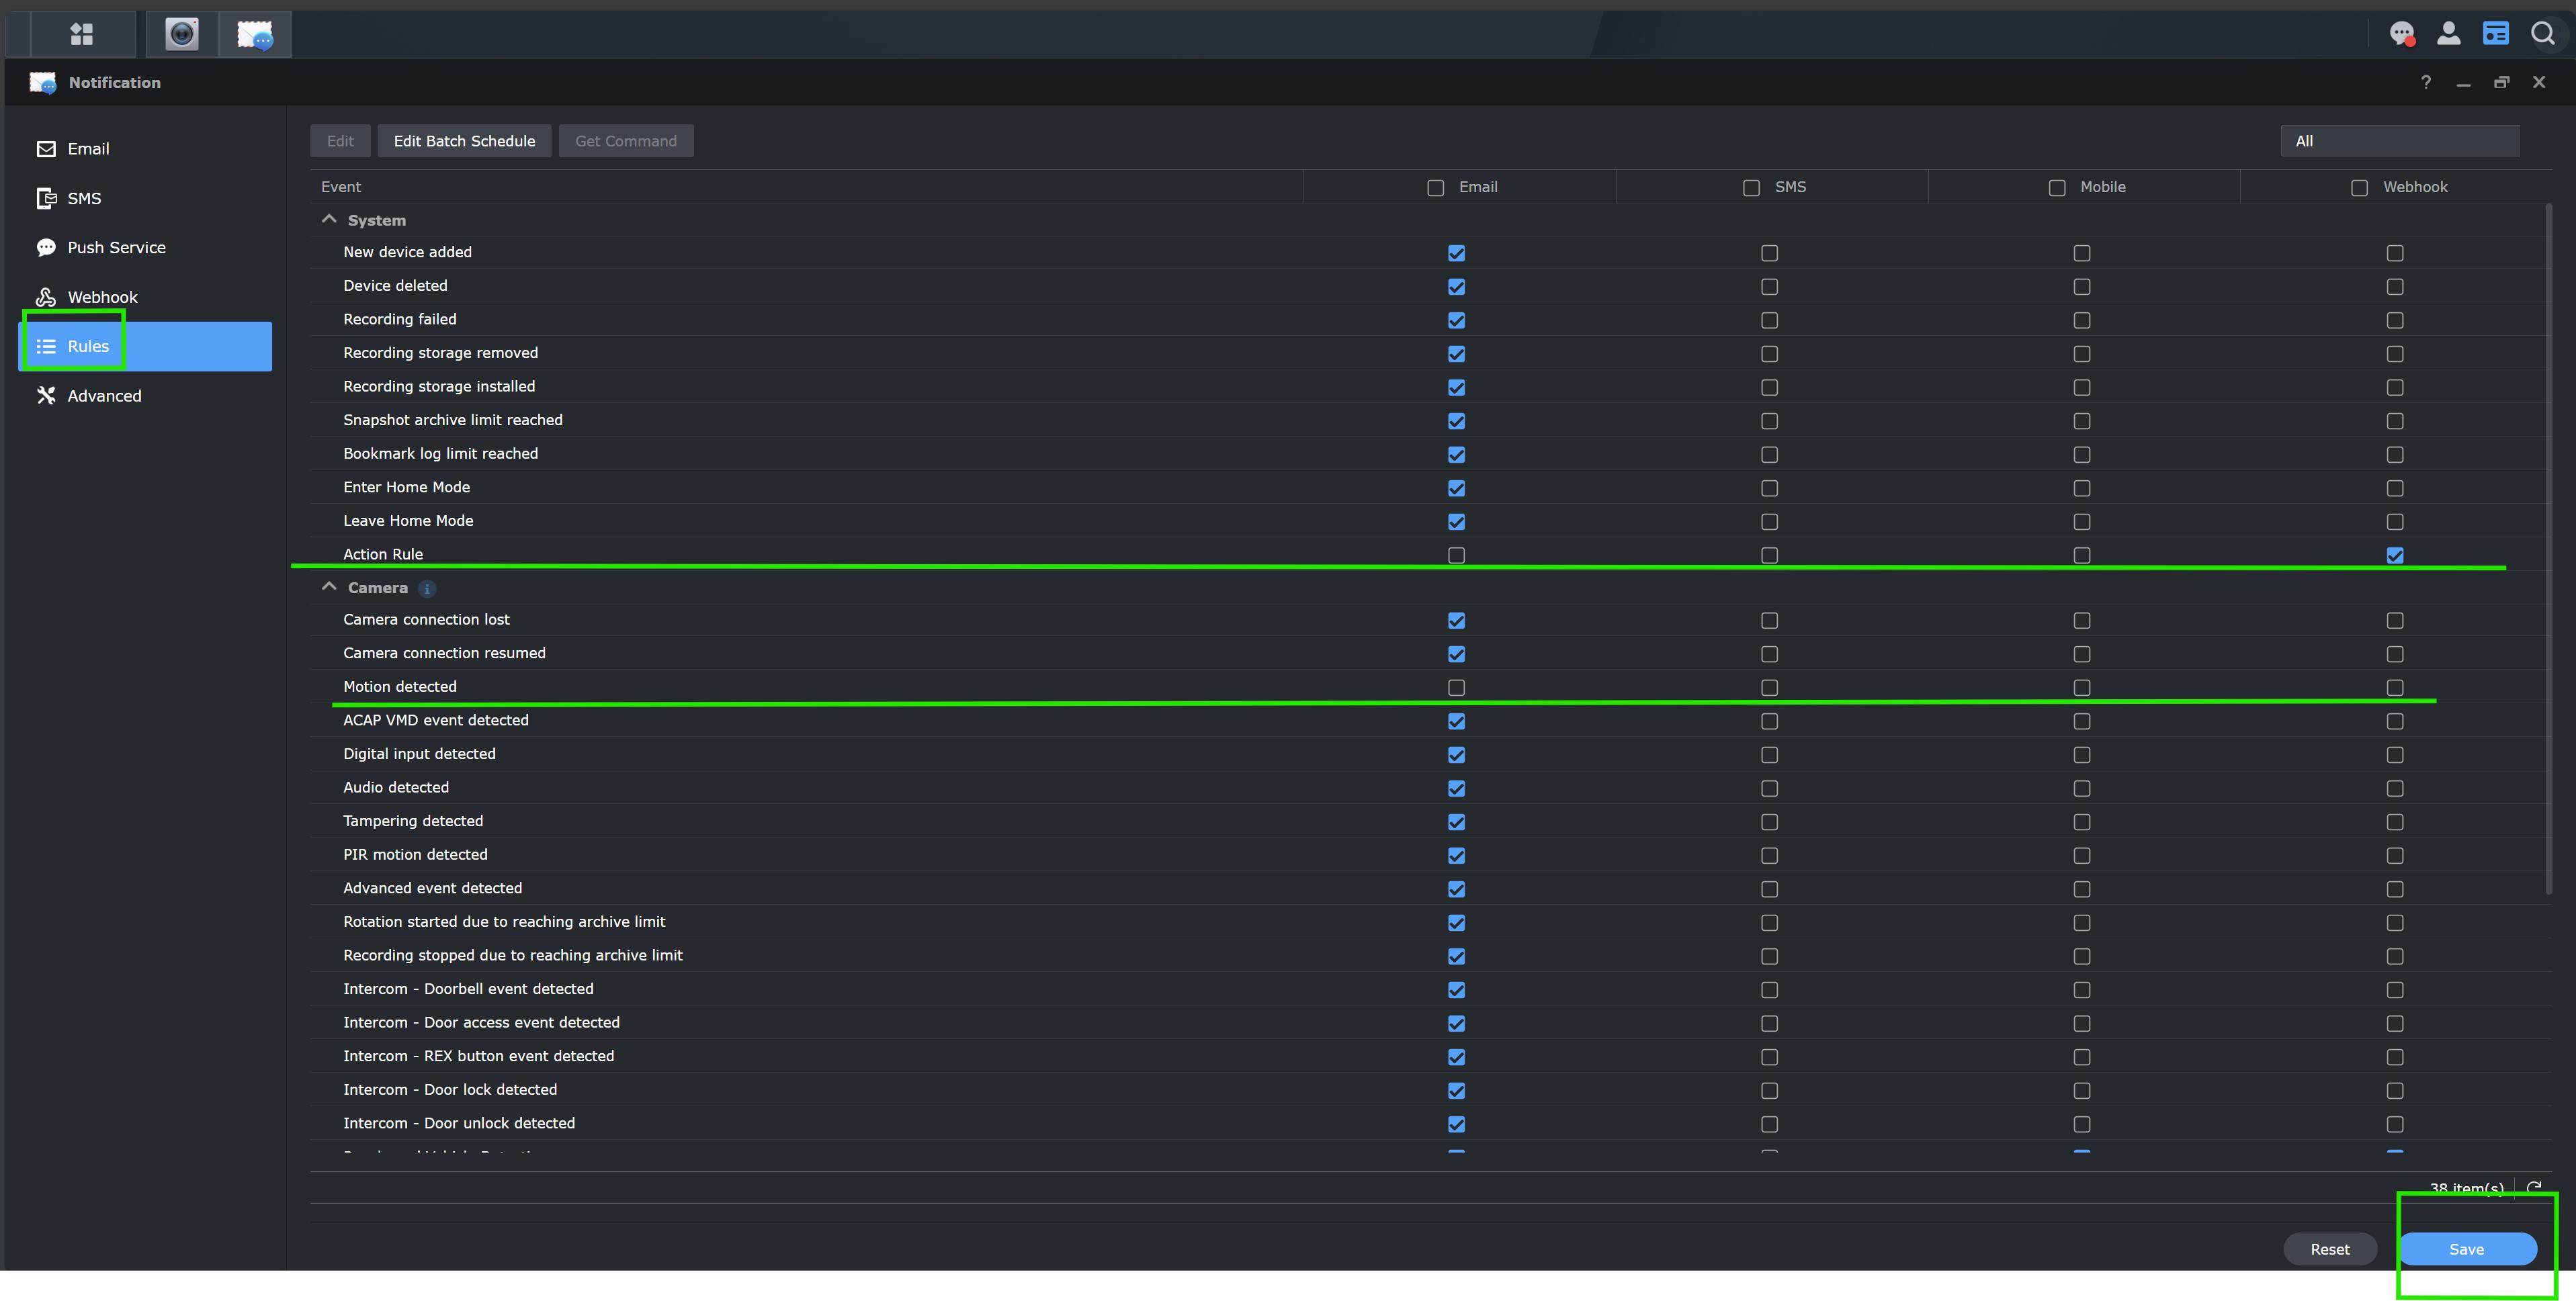
Configure the basic settings for your new webhook
8 Repeat for Additional Cameras
Repeat steps 3-8 for each additional camera you want to monitor with AITrespasser. Create a separate rule for each camera.
Be sure to create a separate rule for each camera you want to monitor. Each rule should be configured with a single camera as its trigger source.
Setup Complete!
Your rules are now configured to send motion detection events from your selected cameras to AITrespasser. When motion is detected by these cameras, the images will be sent to AITrespasser for analysis.
Testing Your Integration
Test Procedure
- Save all your configuration settings
- Trigger a test motion detection event by moving in front of your camera
- Wait a few seconds for image processing
- Check the AITrespasser dashboard to confirm the event was received and processed
Troubleshooting Tips
- Verify motion detection is properly enabled in your camera or Surveillance Station
- Confirm your Synology NAS has internet connectivity
- Check that your API key is correctly entered in the webhook configuration
- Review Surveillance Station logs for webhook transmission errors
Choosing the Right Setup Method
| Feature | All Cameras (Option 1) | Specific Cameras (Option 2) |
|---|---|---|
| Setup Complexity | Simple (one-time setup) | More complex (requires rule per camera) |
| Camera Selection | All cameras included | Precise camera selection |
| Image Analysis Usage | Higher (analyzes all cameras) | Lower (only selected cameras) |
| Best For | Small systems with few cameras or when all cameras need monitoring | Larger systems or when you only want to monitor specific areas |
Recommendation: If you have more than 3 cameras and only want to monitor specific areas (like entrances or driveways), Option 2 is usually more efficient.
Need Help?
Having trouble with your integration? Our support team is ready to assist you with any questions or issues you might encounter.